Angels for 2018
Hi y’all – Angels are rolling out. Take your pick and let me know by grid position (for example, the middle angel in the top picture is B2), plus a couple of alternate picks, please. You can email me at ktoivonen@grandecom.net or else message on Facebook.
Backs are simple, just crossed wire where you can insert a hook or a ribbon. All will come in a bag as below. Price for family and friends (that’s YOU) is $10.00 each plus first-class postage if I am mailing. Thanks for taking a look! [It’s perfectly okay to change your mind now that you get a real look and price.]
A B C

These are the most opaque. Column A streaky pink.
Column B aventurine in green (and one blue)—a deep fine sparkle you can see better by enlarging the photo.
Column C a green/aventurine/streaky.
D E F G

These are more translucent.
Column D is a dark purple with some gold, very pretty with light behind it but not showing up well here.
Column E is a translucent green/turquoise streaky, plus one rogue red/clear.
Column F more red with a red/gold in position F3.
Column G more red/gold. These are the most transparent.
The back and the bag as below:

gimme 30
The Whole30. We finished it off in January, T and me. The Whole30, abbreviated, is a challenge to eat for 30 days without processed foods or most trigger foods like grain, dairy, or sugar.
It was not so big a change for me, already gluten-free, as for my bread-baking, potato-loving husband. The thing I missed most, in fact, was my diet soda, and that stuff isn’t even food. I broke my morning coffee habit too, since it turned out that what I really wanted was coffee-flavored cream, and we weren’t doing that. It took about two weeks for the impulse towards these things to go away. I finished January with an emotional climate of calm happiness. Calm. Happiness. You don’t know what that means to me. Part of it was just from having T on board and accomplishing a challenge together, and part of it was from food-as-medicine, I’m certain.
The Whole30 is not a weight-loss plan. We ate a lot, but we ate it in three meals a day. Keeping them low carb and high fat meant no sugar crashes, no nap attacks, just sustained energy burning until the end of the day. We got very hungry and ate very much and then waited to get hungry again. I think I snacked twice in the whole month. By the end of the day we both felt quite tired—got a pretty consistent 8 or 9 hours of sleep, lucky us.
Results? Within one day all my reflux symptoms went away. Within a week my gut was happy – holiday eating had left it not so much – and within two, a couple of annoying hot spots on my skin had resolved. I lost 5 pounds altogether. I lost fat, not just bloat, and had to buy a new size in pants. My face looks different; my rings are falling off. This was all without any significant exercise to speak of, because I’m still doing physical therapy for my herniated disc, and that’s all I feel I have time for.
Insulin is the key to fat storage. The control of insulin release is the key to fat loss. I’m more convinced of it than ever. (Did I mention Gary Taubes?)
Midway I got a bit tired of cooking…rinsing, chopping, cooking almost every meal…you can’t eat out easily without getting processed foods, and we didn’t try. On the other hand, we ate so well! (Our chickens did too.) Shopping is very easy: go to the produce section, buy some of everything, check out the meat counter, and done!
We had not been on a food budget before, and we didn’t spend significantly more money eating this way. That diet soda habit, the alcohol we were putting away, and various convenience foods all cost money for advertising and packaging, way more than plain food, and we bypassed all that. Admittedly we were eating conventionally-finished meat from the supermarket, not grass-fed. If you’ve been living on rice and beans, this way of eating is going to cost you. But I choose to think it’s pay now or pay later, like all prevention.
I’ve added butter and cream back in now that the Whole30 is over—I missed them. Tried a cup of coffee and got a stomachache, which I had forgotten about but immediately recognized: oh yeah, the coffee stomachache. Why did I drink this stuff again? So that’s not coming back; tea will take its place. The diet soda is banished—as incentive, I’m brewing kombucha, which I love. It’s fizzy and it’s real food. It’s also somewhat insulinogenic since I don’t like it vinegar-sour, so I have to limit it and not drink it like water…as I shouldn’t have been drinking the diet soda, either.
Interested in trying the Whole30? First, get on board with the idea that saturated fat is not your enemy. (Good introductions to this topic on Mark’s Daily Apple and Kurt Harris’s Panu blog.) Next, sharpen your knives and find an extra cutting board (two is not enough). Get acquainted with Mel and her Dino-Chow recipes, maybe take a trip to Penzeys.
Eat.
Don’t do this for weight loss. Don’t weigh yourself during your 30 days. Take a set of before and after measurements. Keep a journal and write down how you feel a couple of times a day.
You may surprise yourself.
skip to the loo, already
It’s a thing we want to know about when we travel: the toilets. Tell us about the facilities. We’ll be visiting several times a day, and we don’t want to make embarrassing mistakes.
The Finnish bathroom is entirely familiar, only better in some respects. The toilet fixture itself is likely to be low-flow, but not those awful sluggish low-flow things we find in the States. I exposed myself as an American chauvinist right there, privately, in the john. I mean, didn’t you always just assume we ‘mericans would have all the best stuff? We’re such good little greedy consumers. So why don’t we have these toilets that work?And then there is often a little hand-held thingy hooked to a sink bowl crowding you in the public stall…a bidet attachment! It took me two visits to figure that one out. How civilized. I want one in my home bath.
In public, the WC is available at cafes, gas stations, indoor markets, and for cash at fully automated pods situated in high-touristed areas. It was a news story widely picked up, for some reason, when the Finnish Roadside Authority started requiring users to text-message the toilet to open the door at rest stops–supposed to reduce vandalism. Finns say it was pretty much a non-issue, as they are all on the phone all the time and already do all sorts of things by mobile phone, including paying for parking, metro tickets, various entertainment…why not for relief?
As an aside…Finns are on the phone all the time. Maybe that’s why they’re so reserved…they’re too busy on the phone to notice the people out there. When we arrived at the Helsinki airport, we were greeted with hugs and a phone–and very handy it was in a family group of six or eight highly impulsive people all headed out in whatever direction looked good at the moment, rarely in synchrony.

As another aside, Nokia made rubber boots long before they made phones. Guess where the higher profit margin resides.
As for the private bathrooms, my experience all comes from relatively new construction, from the 1980s or later. The Finnish bathroom first of all has a handy feature in the door, a “bolt indicator” as I learned while trying to shop for some…I’m looking to adopt the custom here, although all the (expensive) choices I find are sold from the UK. It’s a deadbolt that shows a tiny “occupied” or red dot marker on the outside when locked, just like in an airplane…makes sense to me, a lot more than the dumb doorknob locks we have in this house that don’t actually work anymore. Very subtle sign that I missed until it was pointed out to me, but it saves rattling doorknobs and walking in on your visitors.
The bathroom is divided roughly into four quadrants. There’s a drain towards one side and the floor slopes there…no shower stall or bathtub but a showerhead, maybe with a ring from the ceiling with a shower curtain that can close around. A sink near that, sometimes using a single diverter for the shower and the sink. There’s a big floor squeegee nearby, perhaps, and in that case you squick off the floor after your shower. The other two quadrants hold the toilet throne and a smallish washer and dryer. There might be a towel rack or there might not, and that door over there is not the master closet you’re accustomed to in your American master bath. Clothes and storage are elsewhere. This door leads inward to the electric sauna.
The sauna I love, though, is the one at the summerplace or lake cottage out in the country, a separate little building with a wood stove, the place that’s warm when you’re cold, the place that’s clean when you’re dirty and there’s no running water to be had. The place that smells heavenly, of heated cedar and birch smoke and steam…at least until your husband decides to try throwing beer on the stove. Honestly. He said he saw it on the Simpsons. I said, “and if Homer threw a pig off a bridge, does that mean YOU would–” and then realized that Homer has thrown a pig off a bridge, and it’s better not to give the man ideas. Scorched beer fumes, gah. Pretty much any bad idea you can have, Homer has done it. Although come to think of it, it was Marge who poured the beer on the stove. Hmm.

I guess Marge knew her man. And this topic has been derailed. Oh well. It was time to stop, anyway.
decoupage the house (4): EnviroTex Lite and the cigar box
Cigar boxes, how I do love thee.
Seriously. Just plain old empty wood cigar boxes. The woods, the labels, the fragrance, the sheer nifty goodness of packaging–the fact that there’s something left over after the contents are gone that’s worth having in itself. I could build a shrine to them. Of them. I certainly have enough of them lying around here.
I like them plain, but I give them away decoupaged on top, lined with fabric. I’m loving them even more this year now that I’ve got some decent Envirotex results. It took me a while because I couldn’t find any very detailed description of how it’s done, so here’s one from me. I suggest trying the tray first for reasons described in that post. I’ll be describing top-only Envirotex application.
None of this is hard, but there are critical steps; you cannot get a good result without them.
First, give yourself enough time. When I’m working on a cigar box, I may use wood filler, a finish restorer, gesso, paint, glue, varnish, wax, and Envirotex resin. Each of these has a different cure time. You have to honor cure times. Just because you really need your project to be finished tomorrow isn’t going to speed up the chemical reactions taking place. Mix uncured media and you’re going to get nasty effects.
Prepare the outside of your box as you see fit. I remove labels but generally leave the sides and bottom as they are, and then usually paint the top and apply paper with glue. I most often use Minwax Polycrylic on the bottom and sides of the box, and then seal over the decoupaged top with Polycrylic or Liquitex varnish, two coats minimum.
So…it’s cured, right? If your finish says “allow 3 hours for light handling and 24 hours for normal use,” you’re going to allow 24 hours, right? Because you do not want Envirotex sitting on top there chewing through your sealer.
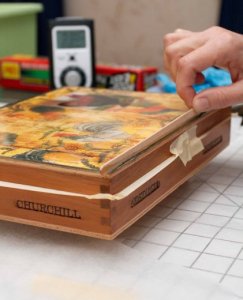
You do not want globs of Envirotex all over the sides of your box either, so coat the sides with paste wax. I use the Johnson’s stuff in a can. Totally coat the sides all the way up to the top edges but do not go over the top, not a speck. Envirotex will not stick to the waxed areas even if it hardens there. Do not buff it up like you would if it were furniture; just leave it to dry. Then apply masking tape to the box-top lip to keep the resin from running in there and sealing your box shut. Cover the latch and hinges too.

the wax will keep the tape from hurting your finish
Now prepare your workspace for pouring Envirotex. You will need to protect your surface–wax paper is good for this. You will need to elevate the box so that if you get drips they will drip off the bottom rather than settling in to glue your box to your table. Set your box up as a dry run and make sure the top of it is level, really as truly level as you can possibly attain. Then find something to be a dust cover while the Envirotex cures for the first eight hours. I use a bowl or plastic bin or whatever can be made dust-free and will fit over without touching the box. Get all of this done before you pour.
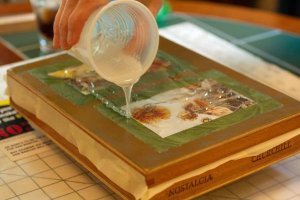
Read the Envirotex instructions. Have a couple of craft stick stirrers handy. Estimate, measure, mix as described in the tray project. But this time, let the mixed resin sit there in the mixing cup for 10 minutes before pouring.
Now, pour, starting with a thin stream in the center and going around and around in roughly the shape of the box top. You will be using less resin than you might for a tray, because you don’t want it all to slop over the edges right away, but it’s still a good thick layer, full of bubbles.
Stop about an inch away from the edge. Let it sit 5 minutes. Ideally, it will not be reaching the edge after 5 minutes, but if it’s close, push it back with the craft stick. You don’t want it there yet.
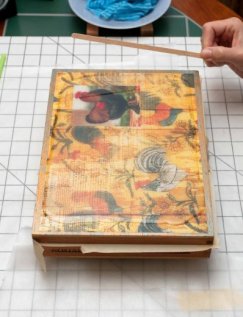
Now work on the bubbles as described in the tray project–except you should not pick up or tilt the box. Have a good light handy and move around to catch the surface at different angles, so you can see bubbles or dust. Keep pushing the resin back from the edges if you need to. Take your time on the bubbles; no need to hyperventilate. Keep shaking the straw!
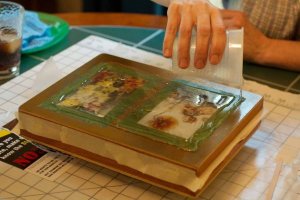
Somewhere around 15 minutes after the actual pour, take your craft stick and drag the resin to each edge. You don’t have to worry about making it level and you don’t want to push a bunch over the edge. All you need to do is lead the resin neatly to the brim; it will flow and level itself, and surface tension will hold it there. I bring the stick right up to the edge of the box-top and kind of saw it back and forth there to make an even edge on the resin.
naturally I have to make the occasional chicken box
go all the way out to the very edge
If it’s really uncontrollable and dripping all over, then you’ve got too much poured on; use less next time.
Work on the bubbles some more. At 25 to 30 minutes after pouring, you should be done. Call it good enough, put the dust cover over, and walk away. And now the hardest part–don’t peek for eight hours!
Once it’s dust-proof, you can uncover it. Let it sit flat for a couple more days to fully cure (72 hours). In the meantime you can remove the tape, and any drips should pop right off your waxed surfaces. If there’s a little ridge left behind after you break off a drip, you can sand it and then polish the edge off with fine steel wool, but wait until the resin is fully hardened.
Last but not least, give it a new coat of wax on all non-resined surfaces. Buff it up. Admire!

decoupage the house (3) : EnviroTex Lite
I love Envirotex as a decoupage medium. It’s a two-part resin, self-leveling, which makes for a beautiful finish but also means it’s going to flow. A tray is ideal for a first Envirotex project, allowing you to get some experience with the pouring and setting up before you have to worry about drips and edges.
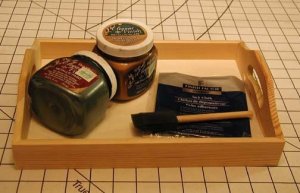
I get de-clutter points for this project too! All this stuff has been just sitting around
Paint the tray and apply your paper. I used acrylic paint and metallic glaze, and then a color copy of an old beer carton I had saved for sheer cuteness, applied with thinned Elmer’s glue. It needed a border, so I cut moose tracks from some variegated brown paper in the stash. (Never said I was brilliantly imaginative, did I?) I covered the decoupage surface with a layer of glue. When it was several hours dry, I added a layer of Minwax Polycrylic on top of the glue, and a couple of layers of Polycrylic for the painted surfaces.

with glue still wet
Whatever your sealer, let it dry thoroughly, overnight at least.
From here on out, your enemy is dust and its friends: bugs, pets, drafts, hair. Your own hair flipping around is a dust wand—tie it back or cover it if it’s longish. You’ll need a level surface for a flat project like a tray to cure, so find one where your cat won’t walk, and wipe it down as much as you can. Find something to protect your project from dust as it cures. Envirotex recommends a box, but I’ve been a lot more successful with something impervious that I can wash off first. A large mixing bowl is ideal. For this tray I didn’t have a bowl big enough, so I used a cookie sheet, which is not ideal. Better to enclose it all the way.
Read through the Envirotex directions. Estimate how much of your ingredients you’ll need. I had the 8 oz package which is good for about 2 sq feet, and my tray is 12 x 9 inches, so I used something less than half of the resin and hardener. It’s much better to have too much than too little.
Measuring is important; you need equal amounts of the Envirotex resin and hardener. Don’t guess or estimate on this. I pour from the resin and hardener bottles into narrower bottles that have volume measurements on them. Get as close as you can to truly equal amounts. I believe there’s a little room for error but if you’re particularly inaccurate, the resin will never harden and it’ll just be a big sticky mess.
Mixing is important. Do two minutes of vigorous stirring, and if you are mixing 4 ounces or more, pour from one container into another as recommended in the Envirotex directions. I use disposable plastic drink cups and a wood stick for stirring. There will be bubbles if you’ve mixed well—lots and lots of bubbles.
As soon as you’re done mixing, wipe the tray surface with a tack cloth, and then pour the Envirotex over. It’s plenty runny, and assuming you’ve mixed enough, it will flow without any help to fill the space available. I came up a little sparse on this tray so ended up smoothing the resin towards the sides with the stick, though I don’t know that I needed to. You can tilt the tray to help coat it, but you won’t have to if you’ve got a generous amount. It’s flowing for at least 45 minutes and will level on its own.
Give it about ten minutes to sit, and then work on the bubbles. This is kind of magic—they pop when exposed to carbon dioxide. You can just blow on them, but I prefer to use a straw to keep my face out of the fumes. Beware, though—the straw acts like a spit valve, so shake it out between breaths or you’ll end up with a big slobbery drip on your beautiful creation. (Ask me how I know!) Just blow gently through the straw over the bubbles and watch them pop. After you get them all, let it sit another five minutes and you’ll find some more. Tilt the tray to catch light reflecting on the surface to show you the last few. Keep working at it. You want to be all done with this step within about half an hour of pouring.
If you find a very stubborn bubble, or, heaven forbid, a bit of dust or hair marring your surface, you can fish it up and out with a straight pin. Don’t be afraid of disrupting the surface at this point; it’s still flowing and will repair itself, unless you’re really short on coverage or you’re trying to do this too late. Get it looking really good, and then let it sit five minutes more. You might find just a few more bubbles have formed. Get rid of them, and be done. Put the tray on your level surface, cover it with your dust cover, and walk away. Picking at it 90 minutes from now will mar the surface. There might be a few specks of dust settling on there while you’re not watching—but there will almost certainly be some if you keep uncovering the thing and messing with it.
Decide that it is good. Don’t disturb it again for eight hours. Then uncover it and love how it looks.

done, high gloss, no brush marks!
Edited to add: It’s dust-proof at this point, but the Envirotex instructions say to allow 72 hours for hard cure in room temperatures. Believe it. In the first 24 hours you can scratch the finish with your fingernail…but then the scratches disappear! Meaning it is still flowing enough to cure a tiny linear flaw…but not the kind of divot you make trying to remove dust or hair (or a BUG), from personal experience. Let it cure flat. After 72 hours, it’s pretty well ready for anything.
more on Envirotex here
