decoupage the house (4): EnviroTex Lite and the cigar box
Cigar boxes, how I do love thee.
Seriously. Just plain old empty wood cigar boxes. The woods, the labels, the fragrance, the sheer nifty goodness of packaging–the fact that there’s something left over after the contents are gone that’s worth having in itself. I could build a shrine to them. Of them. I certainly have enough of them lying around here.
I like them plain, but I give them away decoupaged on top, lined with fabric. I’m loving them even more this year now that I’ve got some decent Envirotex results. It took me a while because I couldn’t find any very detailed description of how it’s done, so here’s one from me. I suggest trying the tray first for reasons described in that post. I’ll be describing top-only Envirotex application.
None of this is hard, but there are critical steps; you cannot get a good result without them.
First, give yourself enough time. When I’m working on a cigar box, I may use wood filler, a finish restorer, gesso, paint, glue, varnish, wax, and Envirotex resin. Each of these has a different cure time. You have to honor cure times. Just because you really need your project to be finished tomorrow isn’t going to speed up the chemical reactions taking place. Mix uncured media and you’re going to get nasty effects.
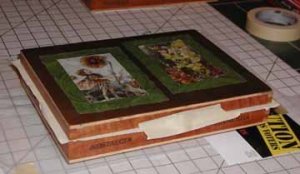
Prepare the outside of your box as you see fit. I remove labels but generally leave the sides and bottom as they are, and then usually paint the top and apply paper with glue. I most often use Minwax Polycrylic on the bottom and sides of the box, and then seal over the decoupaged top with Polycrylic or Liquitex varnish, two coats minimum.
So…it’s cured, right? If your finish says “allow 3 hours for light handling and 24 hours for normal use,” you’re going to allow 24 hours, right? Because you do not want Envirotex sitting on top there chewing through your sealer.
You do not want globs of Envirotex all over the sides of your box either, so coat the sides with paste wax. I use the Johnson’s stuff in a can. Totally coat the sides all the way up to the top edges but do not go over the top, not a speck. Envirotex will not stick to the waxed areas even if it hardens there. Do not buff it up like you would if it were furniture; just leave it to dry. Then apply masking tape to the box-top lip to keep the resin from running in there and sealing your box shut. Cover the latch and hinges too.
the wax will keep the tape from hurting your finish
Now prepare your workspace for pouring Envirotex. You will need to protect your surface–wax paper is good for this. You will need to elevate the box so that if you get drips they will drip off the bottom rather than settling in to glue your box to your table. Set your box up as a dry run and make sure the top of it is level, really as truly level as you can possibly attain. Then find something to be a dust cover while the Envirotex cures for the first eight hours. I use a bowl or plastic bin or whatever can be made dust-free and will fit over without touching the box. Get all of this done before you pour.
Read the Envirotex instructions. Have a couple of craft stick stirrers handy. Estimate, measure, mix as described in the tray project. But this time, let the mixed resin sit there in the mixing cup for 10 minutes before pouring.
Now, pour, starting with a thin stream in the center and going around and around in roughly the shape of the box top. You will be using less resin than you might for a tray, because you don’t want it all to slop over the edges right away, but it’s still a good thick layer, full of bubbles.
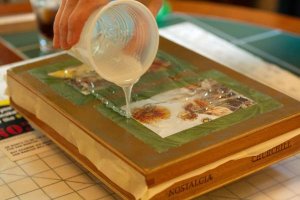

Stop about an inch away from the edge. Let it sit 5 minutes. Ideally, it will not be reaching the edge after 5 minutes, but if it’s close, push it back with the craft stick. You don’t want it there yet.
Now work on the bubbles as described in the tray project–except you should not pick up or tilt the box. Have a good light handy and move around to catch the surface at different angles, so you can see bubbles or dust. Keep pushing the resin back from the edges if you need to. Take your time on the bubbles; no need to hyperventilate. Keep shaking the straw!
Somewhere around 15 minutes after the actual pour, take your craft stick and drag the resin to each edge. You don’t have to worry about making it level and you don’t want to push a bunch over the edge. All you need to do is lead the resin neatly to the brim; it will flow and level itself, and surface tension will hold it there. I bring the stick right up to the edge of the box-top and kind of saw it back and forth there to make an even edge on the resin.

naturally I have to make the occasional chicken box
go all the way out to the very edge
If it’s really uncontrollable and dripping all over, then you’ve got too much poured on; use less next time.
Work on the bubbles some more. At 25 to 30 minutes after pouring, you should be done. Call it good enough, put the dust cover over, and walk away. And now the hardest part–don’t peek for eight hours!
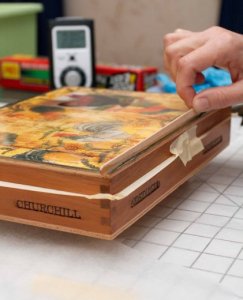
Once it’s dust-proof, you can uncover it. Let it sit flat for a couple more days to fully cure (72 hours). In the meantime you can remove the tape, and any drips should pop right off your waxed surfaces. If there’s a little ridge left behind after you break off a drip, you can sand it and then polish the edge off with fine steel wool, but wait until the resin is fully hardened.
Last but not least, give it a new coat of wax on all non-resined surfaces. Buff it up. Admire!

decoupage the house (3) : EnviroTex Lite
I love Envirotex as a decoupage medium. It’s a two-part resin, self-leveling, which makes for a beautiful finish but also means it’s going to flow. A tray is ideal for a first Envirotex project, allowing you to get some experience with the pouring and setting up before you have to worry about drips and edges.

I get de-clutter points for this project too! All this stuff has been just sitting around
Paint the tray and apply your paper. I used acrylic paint and metallic glaze, and then a color copy of an old beer carton I had saved for sheer cuteness, applied with thinned Elmer’s glue. It needed a border, so I cut moose tracks from some variegated brown paper in the stash. (Never said I was brilliantly imaginative, did I?) I covered the decoupage surface with a layer of glue. When it was several hours dry, I added a layer of Minwax Polycrylic on top of the glue, and a couple of layers of Polycrylic for the painted surfaces.

with glue still wet
Whatever your sealer, let it dry thoroughly, overnight at least.
From here on out, your enemy is dust and its friends: bugs, pets, drafts, hair. Your own hair flipping around is a dust wand—tie it back or cover it if it’s longish. You’ll need a level surface for a flat project like a tray to cure, so find one where your cat won’t walk, and wipe it down as much as you can. Find something to protect your project from dust as it cures. Envirotex recommends a box, but I’ve been a lot more successful with something impervious that I can wash off first. A large mixing bowl is ideal. For this tray I didn’t have a bowl big enough, so I used a cookie sheet, which is not ideal. Better to enclose it all the way.
Read through the Envirotex directions. Estimate how much of your ingredients you’ll need. I had the 8 oz package which is good for about 2 sq feet, and my tray is 12 x 9 inches, so I used something less than half of the resin and hardener. It’s much better to have too much than too little.
Measuring is important; you need equal amounts of the Envirotex resin and hardener. Don’t guess or estimate on this. I pour from the resin and hardener bottles into narrower bottles that have volume measurements on them. Get as close as you can to truly equal amounts. I believe there’s a little room for error but if you’re particularly inaccurate, the resin will never harden and it’ll just be a big sticky mess.
Mixing is important. Do two minutes of vigorous stirring, and if you are mixing 4 ounces or more, pour from one container into another as recommended in the Envirotex directions. I use disposable plastic drink cups and a wood stick for stirring. There will be bubbles if you’ve mixed well—lots and lots of bubbles.
As soon as you’re done mixing, wipe the tray surface with a tack cloth, and then pour the Envirotex over. It’s plenty runny, and assuming you’ve mixed enough, it will flow without any help to fill the space available. I came up a little sparse on this tray so ended up smoothing the resin towards the sides with the stick, though I don’t know that I needed to. You can tilt the tray to help coat it, but you won’t have to if you’ve got a generous amount. It’s flowing for at least 45 minutes and will level on its own.
Give it about ten minutes to sit, and then work on the bubbles. This is kind of magic—they pop when exposed to carbon dioxide. You can just blow on them, but I prefer to use a straw to keep my face out of the fumes. Beware, though—the straw acts like a spit valve, so shake it out between breaths or you’ll end up with a big slobbery drip on your beautiful creation. (Ask me how I know!) Just blow gently through the straw over the bubbles and watch them pop. After you get them all, let it sit another five minutes and you’ll find some more. Tilt the tray to catch light reflecting on the surface to show you the last few. Keep working at it. You want to be all done with this step within about half an hour of pouring.
If you find a very stubborn bubble, or, heaven forbid, a bit of dust or hair marring your surface, you can fish it up and out with a straight pin. Don’t be afraid of disrupting the surface at this point; it’s still flowing and will repair itself, unless you’re really short on coverage or you’re trying to do this too late. Get it looking really good, and then let it sit five minutes more. You might find just a few more bubbles have formed. Get rid of them, and be done. Put the tray on your level surface, cover it with your dust cover, and walk away. Picking at it 90 minutes from now will mar the surface. There might be a few specks of dust settling on there while you’re not watching—but there will almost certainly be some if you keep uncovering the thing and messing with it.
Decide that it is good. Don’t disturb it again for eight hours. Then uncover it and love how it looks.

done, high gloss, no brush marks!
Edited to add: It’s dust-proof at this point, but the Envirotex instructions say to allow 72 hours for hard cure in room temperatures. Believe it. In the first 24 hours you can scratch the finish with your fingernail…but then the scratches disappear! Meaning it is still flowing enough to cure a tiny linear flaw…but not the kind of divot you make trying to remove dust or hair (or a BUG), from personal experience. Let it cure flat. After 72 hours, it’s pretty well ready for anything.
more on Envirotex here
